Why You'll Love It
- - Feather‑light texture that melts on the tongue
- - Bright cherry flavor without overwhelming sweetness
- - Easy one‑bowl batter, perfect for busy weeks
- - Versatile for both brunch and dessert settings
*“The cherry poke cake was the highlight of our Sunday brunch—soft, sweet, and just the right amount of indulgent.”*
Essential Ingredient Guide
- All‑purpose flour: Provides structure; sift to keep the batter airy.
- Fresh cherries: Use pitted, halved cherries for natural sweetness and juicy pockets.
- Butter: Adds richness; softened to incorporate smoothly.
- Vanilla extract: A subtle aromatic note that complements the cherry syrup.
- Cherry syrup: Made from cherry juice, sugar, and a splash of lemon; it infuses flavor into every poke.
- Granulated sugar: Balances the tartness of cherries; adjust slightly for preferred sweetness.
Complete Cooking Process
-
Ingredient Readiness:
Measure flour, sift, and pre‑heat the oven. Pit and halve the cherries, then set aside.
-
Flavor Development:
Combine butter and sugar until creamy, then blend in eggs and vanilla, creating a mellow base before the syrup soaks in.
-
Texture Control:
Fold in the dry ingredients gently; over‑mixing would toughen the cake.
-
Finishing Touches:
After the cake bakes, poke holes with a skewer and pour the warm cherry syrup slowly, letting it sink.
-
Serving Timing:
Allow the cake to rest for ten minutes so the syrup distributes evenly before slicing.
- Use room‑temperature eggs for a smoother batter.
- Let the cherry syrup cool slightly before pouring; too hot can melt the cake surface.
- Poke uniformly spaced holes for even soaking.
- Top with whipped cream or a dusting of powdered sugar for extra elegance.
Pro Tips
Well, those little adjustments make a world of difference. I remember once forgetting to let the syrup cool and the cake ended up a bit soggy—oops! Now I always check the temperature. The result? A cake that holds its shape yet stays luxuriously moist. It’s the kind of dessert that feels like a quiet celebration on any day.
The essence of the dish:
A fun fact or historical angle:
Flavor or sensory focus:
You Must Know
- Use fresh cherry juice for authentic flavor.
- Do not over‑bake; the cake should spring back when touched.
- Allow the syrup to settle for uniform moisture.
Frequently Asked Questions
→ Can I use frozen cherries?
Yes, thaw them and pat dry before folding into the batter; they add a similar sweetness.
→ How long can the cake be stored?
Wrap tightly and refrigerate for up to three days; the syrup keeps it moist.
→ Can I make this cake gluten‑free?
Swap all‑purpose flour for a 1:1 gluten‑free blend; the texture remains light.
→ What if I don’t have a skewer?
A clean fork works fine—just make sure the holes are evenly spaced.
→ Is it possible to add a frosting?
A light whipped cream or vanilla glaze pairs nicely, but the syrup is enough for most.
→ Can I prepare the syrup ahead?
Absolutely; store it in the fridge and warm gently before pouring.
Chef's Tips
If the syrup seems too thick, add a splash of water to thin it.,For extra shine, brush the top with a little melted butter after syrup soaks in.,You can prepare the syrup a day ahead; just warm gently before using.
Nutrition Facts
per serving
340
Calories
5g
Protein
48g
Carbs
14g
Fat
Taste Profile
Sweet‑tart with buttery depth
Ingredient Substitutions
Don't have an ingredient? Try these alternatives
Will give a nuttier flavor and denser texture; use 1‑to‑1.
Coconut oil adds a subtle tropical aroma.
Recipe Variations
Try these delicious twists on the original
Spicy Version
Add a pinch of ground cinnamon and a dash of ginger to the batter for warm spice notes.
Mediterranean Style
Fold in chopped pistachios and a hint of orange zest for a bright, nutty contrast.
Common Mistakes to Avoid
Learn from others' mistakes for perfect results
- Skipping the cooling step before adding syrup, resulting in a soggy top.
- Over‑mixing batter, which makes the cake dense.
- Using too hot syrup, which causes the cake to collapse.
Meal Prep & Storage
Make Ahead Tips
You can bake the cake a day ahead, keep it wrapped, and add the syrup just before serving for maximum freshness.
Leftover Ideas
Reheat gently in a skillet over low heat, adding a splash of milk to keep it moist.
Perfect Pairings
Serve this with...
Cooking Timeline
Gather and measure all ingredients; preheat oven.
Cream butter and sugar, add eggs, combine dry and wet ingredients.
Bake cake, then cool in pan.
Prepare cherry syrup on stovetop.
Poke cake, pour syrup, let rest, then serve.
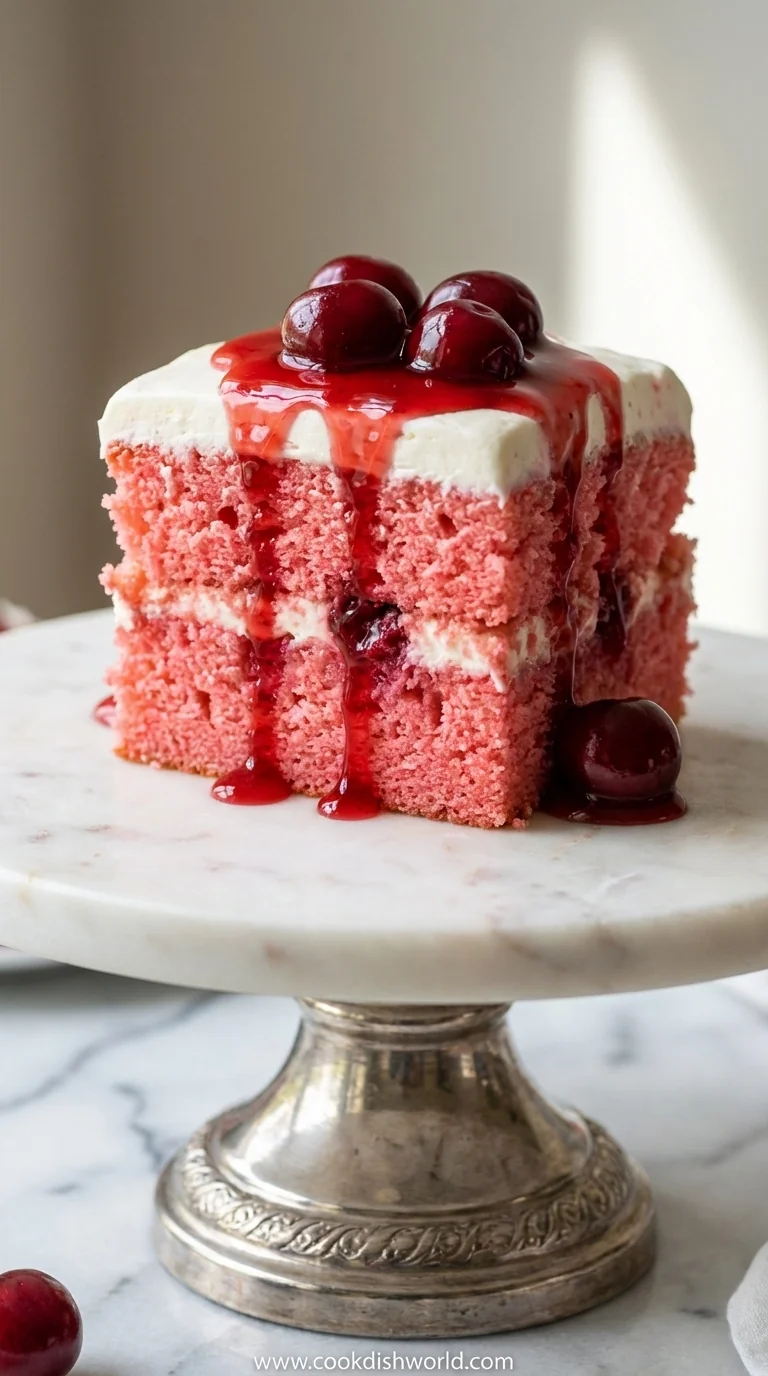
Cherry Poke Cake Recipe – Dreamy & Delicious
A light, airy cherry poke cake drenched in sweet cherry syrup. Perfect for a relaxed brunch or a gentle dessert after dinner. The tender crumb invites you to light sponge memories and the burst of cherry brings a quiet smile.
Timing
Prep Time
20 Minutes
Cook Time
25 Minutes
Total Time
45 Minutes
Recipe Details
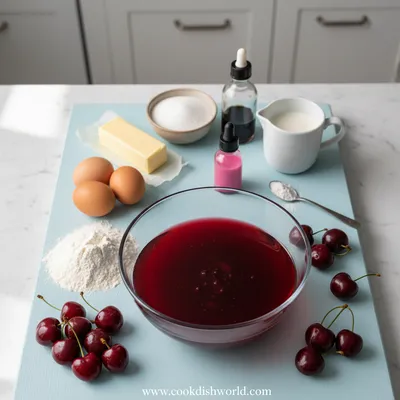
Ingredients
Cake Batter
- 01 2 cups all‑purpose flour
- 02 1 ½ cups granulated sugar
- 03 1 cup unsalted butter, softened
- 04 4 large eggs, room temperature
- 05 1 cup whole milk
- 06 2 tsp baking powder
- 07 ½ tsp salt
- 08 2 tsp vanilla extract
Cherry Syrup
- 01 1 cup cherry juice (or bottled unsweetened)
- 02 ½ cup granulated sugar
- 03 2 tbsp lemon juice
- 04 ¼ cup water
Optional Topping
- 01 Fresh whipped cream
- 02 Powdered sugar for dusting
- 03 Whole pitted cherries for garnish
Instructions
Preheat the oven to 350°F (175°C). Grease a 9‑inch round pan and line the bottom with parchment.
In a large bowl, cream the butter and sugar together until pale and fluffy; this takes about 3‑4 minutes.
Add the eggs one at a time, beating well after each, then stir in vanilla.
Sift flour, baking powder, and salt together. Alternate adding the dry mixture and milk to the butter mixture, beginning and ending with dry ingredients.
Fold in halved fresh cherries gently, then pour batter into the prepared pan.
Bake for 25‑30 minutes, or until a toothpick inserted near the center comes out clean. Let the cake cool in the pan for 10 minutes.
While the cake cools, combine cherry juice, sugar, lemon juice, and water in a saucepan. Bring to a simmer, stirring until sugar dissolves; remove from heat.
Poke the warm cake uniformly with a skewer or fork, then slowly drizzle the warm cherry syrup over the surface, allowing it to soak in.
Let the cake rest for another 10 minutes to absorb the syrup fully, then turn out onto a serving plate. Top with whipped cream, a dusting of powdered sugar, and a few whole cherries if desired.
Notes & Tips
- 1 If the syrup seems too thick, add a splash of water to thin it.
- 2 For extra shine, brush the top with a little melted butter after syrup soaks in.
- 3 You can prepare the syrup a day ahead; just warm gently before using.
Tools You'll Need
-
9‑inch round cake pan
-
Mixing bowls
-
Electric mixer or whisk
-
Spatula
-
Skewer or fork
-
Saucepan
Must-Know Tips
- Don’t over‑mix batter; it keeps the cake light.
- Room‑temperature eggs blend better.
- Let the syrup cool slightly to avoid soggy texture.
Professional Secrets
- Cream butter and sugar until ribbons form, for maximum air incorporation.
- Sift dry ingredients twice to ensure even distribution.
- Allow the cake to rest after baking before adding syrup; this prevents collapse.

Recipe by
AmeliaAmelia is a seasoned food blogger and recipe creator at CookDishWorld, where she blends culinary expertise with an unwavering love for sharing delicio ...
Get Delicious Recipes Weekly
Join 25,000+ home cooks getting our best recipes straight to their inbox.
Free forever • No spam • Unsubscribe anytime