Why You'll Love It
- - No‑bake assembly, perfect for hot days
- - Creamy vanilla ice cream meets fluffy cake
- - Easy to customize with your favorite toppings
- - A nostalgic treat that feels like a hug
"The cake tastes just like the store version, but with a homemade heart that makes every bite feel special."
Essential Ingredient Guide
- Vanilla ice cream: Choose a high‑quality brand; let it soften just enough to spread easily.
- Yellow cake mix: A simple box mix works; adds light texture without extra effort.
- Whipped topping: Stabilized topping keeps the outer layer airy and firm.
- Butter: Melted butter binds the cake crumb to the pan, preventing cracks.
- Chocolate syrup: A drizzle adds a subtle richness that balances the vanilla.
- Sprinkles: Optional; adds a festive crunch and visual sparkle.
Complete Cooking Process
-
Ingredient Readiness:
Soften the ice cream, prepare the cake batter, and pre‑heat the oven for a quick bake.
-
Flavor Development:
The vanilla ice cream absorbs a hint of melted butter, creating a smooth base.
-
Texture Control:
Bake the cake just until golden; this keeps it soft enough to fold into the ice cream.
-
Finishing Touches:
Layer the cake, ice cream, and topping, then freeze until firm.
-
Serving Timing:
Let the cake sit ten minutes at room temperature before slicing for clean cuts.
- Line the pan with parchment for easy release.
- Use a metal spatula to spread softened ice cream evenly.
- Freeze the cake at least 2 hours for firm slices.
- Add a pinch of salt to the butter for depth.
Pro Tips
When you pull the cake from the freezer, the edges may look a little frosty—just let it sit a brief moment. This pause lets the outer whipped topping soften just enough to slice cleanly, and you’ll notice the faint scent of vanilla rising, reminding you why this dessert feels like a celebration every time.
The essence of the dish:
A fun fact or historical angle:
Flavor or sensory focus:
You Must Know
- Freeze the cake at least 2 hours
- Use stabilized whipped topping
- Allow a brief rest before slicing
Frequently Asked Questions
→ Can I use homemade ice cream?
Absolutely—just make sure it’s firm enough to spread; a quick chill in the freezer helps.
→ What size pan works best?
A 9‑inch round springform pan gives a classic shape and easy release.
→ How long can leftovers be stored?
Keep sealed in the freezer; it stays fresh for up to two weeks.
→ Can I add fruit layers?
Yes, a thin layer of fresh berries between cake and ice cream adds brightness.
→ Do I need to bake the cake?
A quick 12‑minute bake ensures a light crumb that won’t sog up the ice cream.
→ Is this cake gluten‑free?
Swap the cake mix for a gluten‑free blend; the rest of the recipe stays the same.
Chef's Tips
Make sure the cake is completely cool before adding ice cream to prevent melting.,Use a metal spatula for smooth spreading of the ice cream layer.,If the cake cracks, patch with a thin layer of whipped topping before the final freeze.
Nutrition Facts
per serving
380
Calories
5g
Protein
44g
Carbs
18g
Fat
Taste Profile
A sweet, creamy, and comforting flavor that evokes classic sundae memories.
Ingredient Substitutions
Don't have an ingredient? Try these alternatives
Provides a dairy‑free option; keep the same chilling time.
Whip until stiff peaks; it holds up well when frozen.
Recipe Variations
Try these delicious twists on the original
Spicy Version
Add a pinch of cayenne and drizzle with spicy chocolate sauce for a subtle kick.
Mediterranean Style
Fold chopped pistachios and a hint of orange zest into the ice cream for a bright twist.
Common Mistakes to Avoid
Learn from others' mistakes for perfect results
- Over‑baking the cake makes it too dry.
- Using ice cream that’s too hard to spread.
- Skipping the parchment line, causing sticking.
Meal Prep & Storage
Make Ahead Tips
You can bake the cake layer and freeze it up to 3 days ahead; assemble the ice cream layers when ready to serve.
Leftover Ideas
Slice remaining cake and store in an airtight container in the freezer; thaw briefly before serving for optimal texture.
Perfect Pairings
Serve this with...
Cooking Timeline
Preheat oven, grease pan, and prepare cake batter.
Bake cake layer until lightly golden.
Cool cake, line with parchment, and chill briefly.
Mix softened ice cream with butter and spread over cake.
Add whipped topping, drizzle chocolate, and freeze.
Allow cake to set in freezer for at least 2 hours.
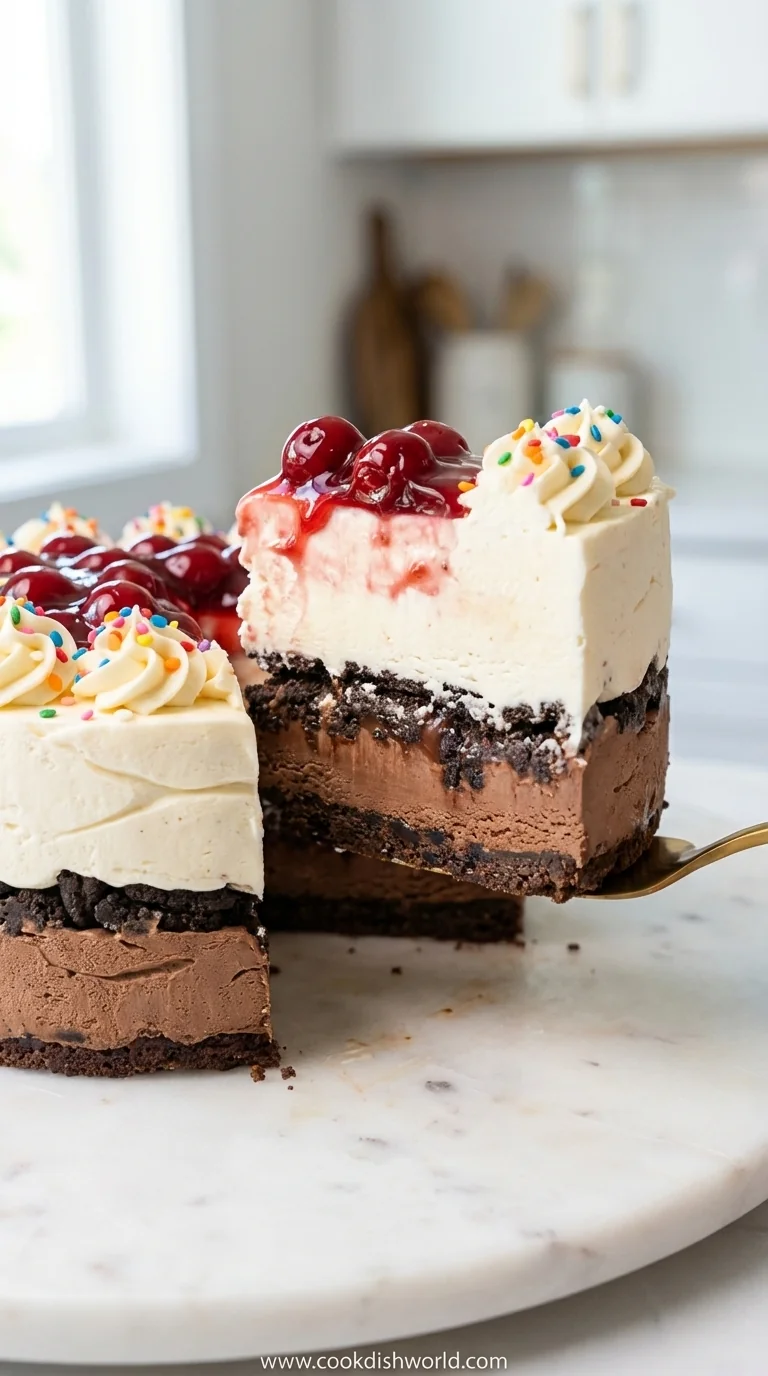
DQ Ice Cream Cake Recipe
A nostalgic DQ Ice Cream Cake at home—creamy layers, fluffy cake, and that classic DQ swirl that brings back sweet memories.
Timing
Prep Time
20 Minutes
Cook Time
12 Minutes
Total Time
2 Hours 32 Minutes
Recipe Details
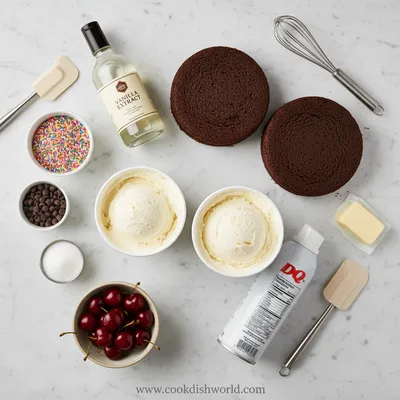
Ingredients
Cake Layer
- 01 1 box yellow cake mix
- 02 1/2 cup melted butter
- 03 2 eggs
- 04 1/2 cup water
Ice Cream Layer
- 01 1 quart vanilla ice cream, softened
- 02 2 tbsp melted butter (for mixing)
- 03 1 tsp vanilla extract
Topping
- 01 1 cup stabilized whipped topping
- 02 2 tbsp chocolate syrup
- 03 Sprinkles, optional
Instructions
Preheat oven to 350°F (175°C). Grease a 9‑inch springform pan and line the bottom with parchment.
Mix cake batter according to the box, adding melted butter for extra richness, then pour into the pan and bake 12 minutes until lightly golden.
Let the cake cool completely, then place a piece of parchment over the top and chill in the freezer for 15 minutes.
Whisk softened vanilla ice cream with melted butter and vanilla extract until smooth; spread evenly over the chilled cake layer.
Spread whipped topping over the ice cream, drizzle with chocolate syrup, sprinkle with sprinkles if desired, and freeze the assembled cake for at least 2 hours.
When ready to serve, run a warm knife around the edge, release the springform, let the cake sit ten minutes, then slice and enjoy.
Notes & Tips
- 1 Make sure the cake is completely cool before adding ice cream to prevent melting.
- 2 Use a metal spatula for smooth spreading of the ice cream layer.
- 3 If the cake cracks, patch with a thin layer of whipped topping before the final freeze.
Tools You'll Need
-
9‑inch springform pan
-
Mixing bowls
-
Electric mixer
-
Spatula
-
Freezer-safe container
-
Sharp knife
Must-Know Tips
- Don’t over‑bake the cake; it should stay soft.
- Let the ice cream soften just enough to spread.
- Freeze the cake long enough for clean slices.
Professional Secrets
- Room‑temperature butter blends evenly with ice cream for a silky texture.
- A light dusting of flour on parchment prevents sticking.
- Cold water for the cake batter yields a fluffier crumb.

Recipe by
AmeliaAmelia is a seasoned food blogger and recipe creator at CookDishWorld, where she blends culinary expertise with an unwavering love for sharing delicio ...
Get Delicious Recipes Weekly
Join 25,000+ home cooks getting our best recipes straight to their inbox.
Free forever • No spam • Unsubscribe anytime