Why You'll Love It
- - No ice‑cream maker required, just a bag and some ice.
- - Ready in ten minutes, perfect for spontaneous cravings.
- - Kid‑friendly process that doubles as a fun activity.
- - Customizable flavors using pantry staples.
"My kids begged for this every summer—no mess, no fuss, pure happiness!"
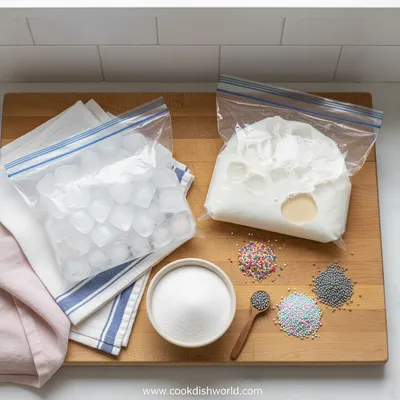
Essential Ingredient Guide
- Heavy cream: Provides the rich, velvety body; choose a fresh, cold carton for best texture.
- Whole milk: Balances the richness; a cold bottle helps the mixture freeze evenly.
- Sugar: Sweetens without overwhelming; adjust to taste, especially for younger palates.
- Vanilla extract: Adds fragrant warmth; a splash is enough to lift the flavor.
- Ice: Crushed ice creates the cold bath; the finer the ice, the faster the chill.
- Salt: Lowers the freezing point of water, allowing the mixture to become creamy.
Complete Cooking Process
-
Ingredient Readiness:
Gather all cold ingredients and measure them before you start; this prevents the ice from melting while you’re still prepping.
-
Flavor Development:
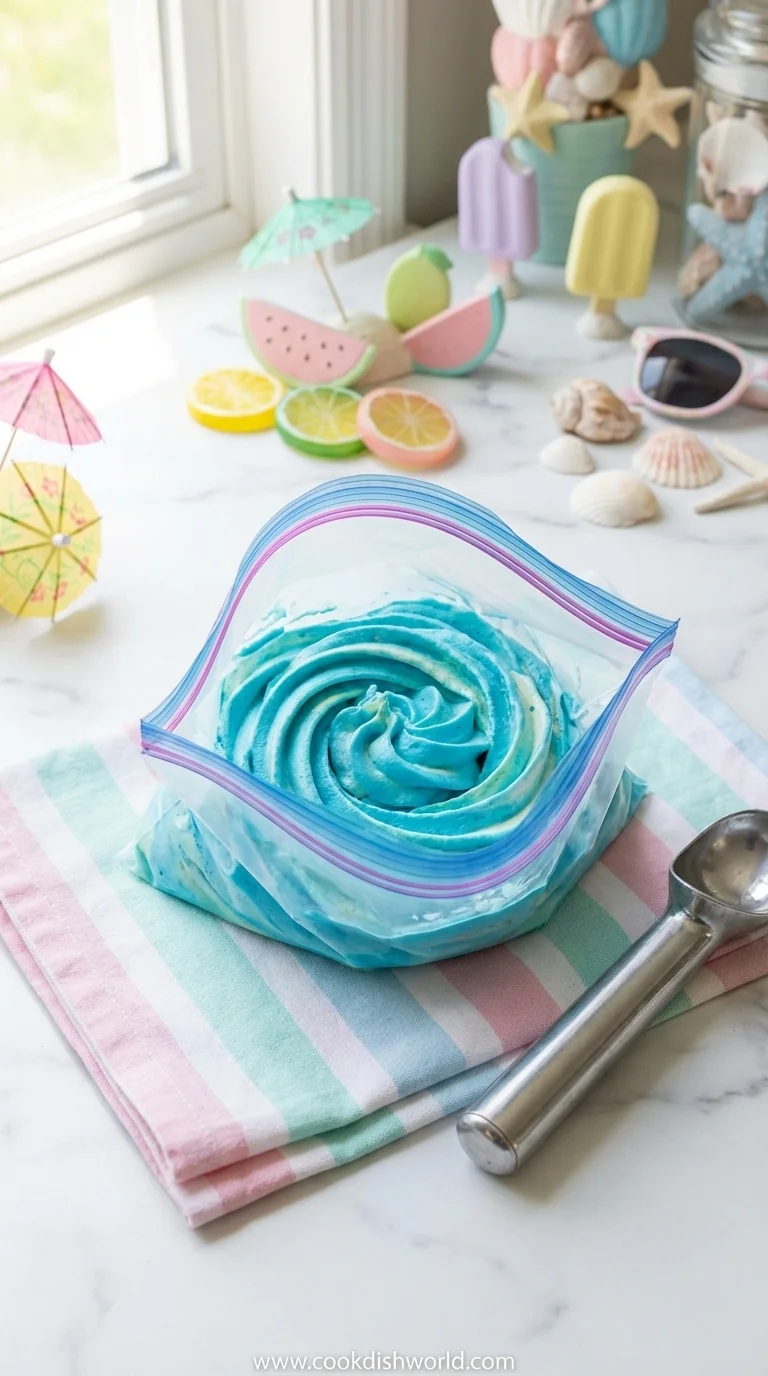
Combine cream, milk, sugar, and vanilla in a small zip‑lock bag, then seal tightly to capture the scent of vanilla.
-
Texture Control:
Place the sealed bag inside a larger bag filled with ice and salt, then shake vigorously for 5‑7 minutes until the mixture thickens.
-
Finishing Touches:
Transfer the ice cream to a bowl, swirl in fresh berries or a drizzle of chocolate if desired, and serve immediately.
-
Serving Timing:
Enjoy right away for the soft‑serve feel, or freeze an extra 30 minutes for a firmer scoop.
- Use a double‑bag method to avoid leaks.
- Shake with a towel for a better grip and less splatter.
- Add a pinch of cinnamon for a warm autumn twist.
Pro Tips
Well, these small adjustments make a big difference. I remember one summer when the bag split mid‑shake—oops! A towel saved the day and the dessert. So, keep a towel handy, and don’t be afraid to experiment with flavors. The joy is in the process as much as the result.
The essence of the dish:
A fun fact or historical angle:
Flavor or sensory focus:
You Must Know
- Ice must be very cold for quick freezing
- Salt is essential to lower the freezing point
- Shake continuously for even texture
Frequently Asked Questions
→ Can I use alternative milks?
Absolutely. Almond, oat, or coconut milk work well, just keep the mixture cold and you may need a touch more sugar.
→ Do I need rock salt?
Regular table salt works fine; the key is to have enough to lower the freezing point of the ice.
→ How long can I store the ice cream?
Transfer to an airtight container and freeze for up to 2 days; it will firm up more the longer it sits.
→ Can I add mix‑ins like chocolate chips?
Yes, fold them in after the ice cream reaches a soft‑serve consistency, then give a quick stir.
→ Is this recipe suitable for vegans?
Swap heavy cream and milk for coconut cream and a plant‑based milk; the texture remains silky.
→ What size bag should I use?
A standard 1‑quart zip‑lock bag works perfectly for the inner bag; the outer bag should be at least 2‑quart.
Chef's Tips
Use a towel to grip the bag for a better shake and to keep your hands warm.,If the bag leaks, double‑bag it before shaking next time.,Feel free to experiment with flavors—add a pinch of cinnamon or swirl in fruit puree after shaking.
Nutrition Facts
per serving
210
Calories
3g
Protein
22g
Carbs
12g
Fat
Taste Profile
Creamy sweet with a hint of vanilla
Ingredient Substitutions
Don't have an ingredient? Try these alternatives
Provides a dairy‑free richness; may add a subtle coconut flavor.
Use slightly less honey as it adds extra moisture.
Recipe Variations
Try these delicious twists on the original
Spicy Version
Add a pinch of cayenne pepper and a drizzle of honey for a gentle heat.
Mediterranean Style
Mix in chopped pistachios and a sprinkle of orange zest for a bright twist.
Common Mistakes to Avoid
Learn from others' mistakes for perfect results
- Using warm ingredients, causing the ice to melt too quickly.
- Not sealing the inner bag tightly, leading to water intrusion.
- Shaking for too short a time, resulting in a runny texture.
Meal Prep & Storage
Make Ahead Tips
You can whisk the cream, milk, sugar, and vanilla together and keep it chilled for up to 24 hours before shaking.
Leftover Ideas
Re‑scoop into a bowl and let sit at room temperature for a few minutes before enjoying again.
Perfect Pairings
Serve this with...
Cooking Timeline
Gather and measure all cold ingredients.
Seal the small bag with cream mixture.
Shake the double‑bag vigorously until the mixture thickens.
Transfer to bowls, add toppings, and serve.
Ice Cream in a Bag - Quick Kid‑Approved Dessert
A simple, no‑churn ice cream made in a zip‑lock bag—ready in ten minutes, perfect for kids and summer days.
Timing
Prep Time
5 Minutes
Cook Time
10 Minutes
Total Time
15 Minutes
Recipe Details
Ingredients
Main Ingredients
- 01 1 cup heavy cream, chilled
- 02 1 cup whole milk, chilled
- 03 1/4 cup granulated sugar
- 04 1 tsp vanilla extract
- 05 1/2 cup ice cubes, crushed
- 06 2 tbsp salt (rock or table)
Optional Add‑Ins
- 01 Fresh berries
- 02 Chocolate shavings
- 03 Caramel drizzle
Instructions
Place the heavy cream, milk, sugar, and vanilla into a small zip‑lock bag. Seal tightly, removing as much air as possible.
Fill a larger zip‑lock bag halfway with crushed ice and add the salt. Place the sealed small bag inside, then seal the large bag.
Shake the double‑bag vigorously for 5‑7 minutes. You’ll feel the bag getting colder and the mixture thicken.
Open the small bag, scoop the soft‑serve ice cream into bowls, and top with optional add‑ins or a drizzle of caramel.
If you prefer a firmer texture, transfer the ice cream to a container and freeze for an additional 30 minutes.
Notes & Tips
- 1 Use a towel to grip the bag for a better shake and to keep your hands warm.
- 2 If the bag leaks, double‑bag it before shaking next time.
- 3 Feel free to experiment with flavors—add a pinch of cinnamon or swirl in fruit puree after shaking.
Tools You'll Need
-
Small zip‑lock bag (1‑quart)
-
Large zip‑lock bag (2‑quart)
-
Towel or dishcloth
-
Measuring cups and spoons
-
Spoon for serving
Must-Know Tips
- Don't overcrowd the ice; keep the mixture moving for even freezing.
- Let the bag rest a few seconds between vigorous shakes to avoid overheating your hands.
- Taste the mixture after 5 minutes; you can adjust sweetness before the final chill.
Professional Secrets
- Use rock salt for a lower freezing point, resulting in a smoother texture.
- Shake with a rhythmic motion to evenly distribute the cold.
- Seal bags tightly to prevent water from entering the cream mixture.

Recipe by
AmeliaAmelia is a seasoned food blogger and recipe creator at CookDishWorld, where she blends culinary expertise with an unwavering love for sharing delicio ...
Get Delicious Recipes Weekly
Join 25,000+ home cooks getting our best recipes straight to their inbox.
Free forever • No spam • Unsubscribe anytime