Why You'll Love It
- - No oven needed, perfect for hot days
- - Silky chocolate flavor that feels indulgent
- - Quick prep, set and serve in under an hour
- - Versatile base that can be dressed up
*"The texture is so smooth, it felt like a chocolate cloud—my family can’t get enough!"*
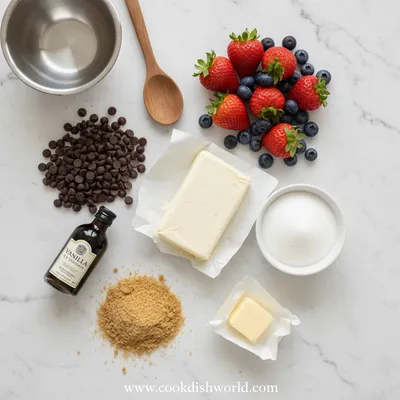
Essential Ingredient Guide
- Cream cheese: Choose full‑fat cream cheese for the richest mouthfeel; let it soften at room temperature before mixing.
- Dark chocolate: Use high‑quality dark chocolate (70% cacao) for depth; melt gently over a bain‑marie.
- Whipped topping: Stiff peaks add airy lightness; fold gently to keep the mousse fluffy.
- Graham crackers or Oreo crumbs: Provides a buttery crunch; toast lightly for extra aroma.
- Lemon juice: A splash brightens the chocolate and balances richness.
- Sugar: Adjust to taste; if using sweetened whipped topping, you may reduce the amount.
Complete Cooking Process
-
Ingredient Readiness:
Soften cream cheese, melt chocolate, and whisk together the sweeteners; keep everything at a similar temperature.
-
Flavor Development:
Combine melted chocolate with cream cheese and lemon juice, allowing the cocoa aroma to mingle with the tangy notes.
-
Texture Control:
Fold in whipped topping carefully to retain air, creating that light, mousse‑like consistency.
-
Finishing Touches:
Press the crumb base into the pan, spread the filling, and chill until firm.
-
Serving Timing:
Let the cheesecake sit at room temperature for 10 minutes before slicing for clean cuts.
- Use a springform pan for easy removal.
- Chill for at least 4 hours for best firmness.
- Garnish with fresh berries for a pop of color.
- Add a drizzle of melted chocolate just before serving.
Pro Tips
I find that letting the dessert rest a moment after taking it out of the fridge lets the flavors settle, almost like a quiet pause before a story begins. It also makes slicing smoother, so you won’t end up with crumbles in your plate. Enjoy the calm that comes with each bite.
The essence of the dish:
A fun fact or historical angle:
Flavor or sensory focus:
You Must Know
- Keep the filling chilled until serving.
- Do not over‑mix the chocolate and cream cheese.
- Use a chilled pan for the crust.
Frequently Asked Questions
→ Can I use milk chocolate instead of dark chocolate?
Yes, but the flavor will be sweeter and less intense; you may want to reduce added sugar.
→ How long can I store the cheesecake?
Keep it refrigerated in an airtight container for up to 4 days.
→ Can I freeze it?
Freezing is possible; wrap tightly and consume within 2 months, thaw in the fridge before serving.
→ What if I don’t have a springform pan?
A regular 9‑inch pie dish works fine—just line it with parchment for easier removal.
→ Is this recipe gluten‑free?
Swap the graham cracker crust for gluten‑free crumbs or almond meal.
→ Can I add a topping?
Fresh berries, shaved chocolate, or a drizzle of caramel complement the rich chocolate flavor.
Chef's Tips
If the crust feels dry, add a tablespoon more melted butter.,For a deeper flavor, let the melted chocolate cool slightly before mixing.,Do not over‑mix the filling; it can become dense.
Nutrition Facts
per serving
420
Calories
6g
Protein
35g
Carbs
28g
Fat
Taste Profile
Rich chocolate with a gentle tang
Ingredient Substitutions
Don't have an ingredient? Try these alternatives
Less fat, similar texture; may need a bit more sugar.
Creates a lighter chocolate flavor; adjust sugar accordingly.
Recipe Variations
Try these delicious twists on the original
Spicy Version
Add a pinch of cayenne pepper and a drizzle of chocolate‑chili sauce for a gentle kick.
Mediterranean Style
Swap the chocolate for dark chocolate with orange zest and garnish with toasted pistachios.
Common Mistakes to Avoid
Learn from others' mistakes for perfect results
- Over‑mixing the filling, which makes it dense.
- Not chilling the crust long enough, leading to a soggy base.
- Using chocolate that is too sweet, which overpowers the cheese.
Meal Prep & Storage
Make Ahead Tips
You can assemble the crust and fill the cheesecake up to 24 hours ahead; keep it refrigerated until ready to serve.
Leftover Ideas
Keep leftovers chilled; gently warm a slice in the microwave for 10‑15 seconds if you prefer a softer texture.
Perfect Pairings
Serve this with...
Cooking Timeline
Prepare crust: combine crumbs, butter, and sugar; press into pan.
Blend cream cheese, sugar, lemon, and vanilla; stir in melted chocolate.
Fold whipped cream into chocolate mixture; spread over crust.
Refrigerate to set; optional garnish preparation.
Slice, garnish, and serve.
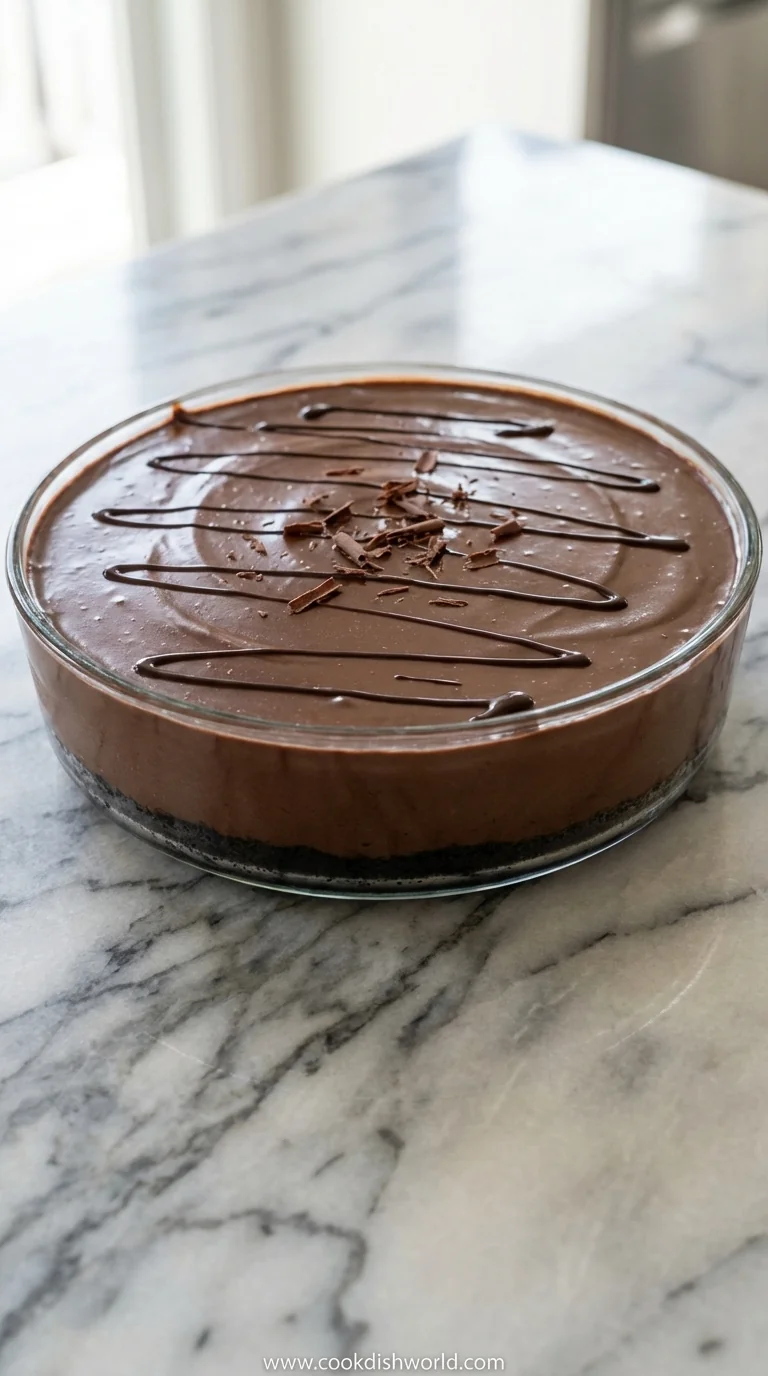
No-Bake Chocolate Cheesecake
A silky, no‑bake chocolate cheesecake that melts in your mouth, ready in minutes for any gathering.
Timing
Prep Time
20 Minutes
Cook Time
0 Minutes
Total Time
4 Hours 20 Minutes
Recipe Details
Ingredients
Crust
- 01 1 ½ cups graham cracker crumbs
- 02 ¼ cup melted butter
- 03 2 tbsp sugar
Filling
- 01 16 oz (2 cups) full‑fat cream cheese, softened
- 02 8 oz dark chocolate, melted
- 03 ½ cup powdered sugar
- 04 2 tbsp lemon juice
- 05 1 tsp vanilla extract
- 06 1 cup heavy whipping cream, whipped to stiff peaks
Garnish
- 01 Fresh raspberries or strawberries
- 02 Shaved chocolate
- 03 Optional mint leaves
Instructions
Combine graham cracker crumbs, melted butter, and sugar in a bowl; press firmly into the bottom of a 9‑inch springform pan.
In a large mixing bowl, beat the softened cream cheese until smooth; add powdered sugar, lemon juice, and vanilla, mixing gently.
Stir the melted dark chocolate into the cream cheese mixture until fully incorporated; the scent of chocolate will fill the kitchen.
Fold the whipped cream into the chocolate‑cream cheese blend in three additions, being careful not to deflate the air.
Spread the filling over the crust, smooth the top, and refrigerate for at least 4 hours or overnight until set.
Before serving, garnish with fresh berries, shaved chocolate, and a mint leaf if desired; gently run a knife through warm water for clean slices.
Notes & Tips
- 1 If the crust feels dry, add a tablespoon more melted butter.
- 2 For a deeper flavor, let the melted chocolate cool slightly before mixing.
- 3 Do not over‑mix the filling; it can become dense.
Tools You'll Need
-
Springform pan
-
Mixing bowls
-
Hand mixer or stand mixer
-
Spatula
-
Rubber scraper
-
Measuring cups and spoons
Must-Know Tips
- Don’t over‑mix the chocolate and cream cheese; gentle folding keeps it airy.
- Chill the crust before adding filling to prevent sogginess.
- Use a chilled knife for clean slicing.
Professional Secrets
- Room temperature cream cheese ensures a smooth blend without lumps.
- Melting chocolate over low heat prevents scorching and keeps a glossy finish.
- Folding whipped cream in three stages retains maximum air.

Recipe by
AmeliaAmelia is a seasoned food blogger and recipe creator at CookDishWorld, where she blends culinary expertise with an unwavering love for sharing delicio ...
Get Delicious Recipes Weekly
Join 25,000+ home cooks getting our best recipes straight to their inbox.
Free forever • No spam • Unsubscribe anytime