Why You'll Love It
- - The color is festive without being overwhelming
- - A gentle cocoa flavor that doesn’t dominate
- - Cream cheese frosting adds a perfect balance of sweet and tangy
- - Simple pantry ingredients keep it accessible
*"The frosting was like a cloud, and the crumb stayed moist for days!"*
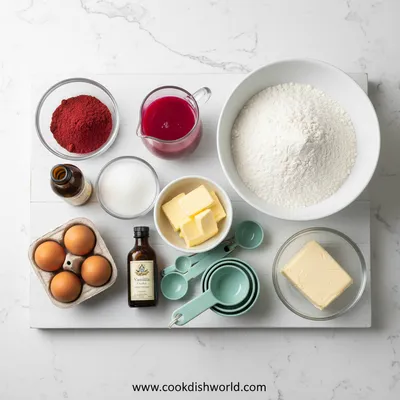
Essential Ingredient Guide
- All‑purpose flour: Provides structure; sift for a lighter crumb.
- Cocoa powder: Only a tablespoon, it gives depth without turning the cake brown.
- Buttermilk: Adds tenderness and a slight tang that complements the frosting.
- Cream cheese frosting: Use full‑fat cream cheese for richness; soften before mixing.
- Red food coloring: Gel colors give the brightest hue with less liquid.
- White sugar: Granulated sugar dissolves evenly for a smooth batter.
Complete Cooking Process
-
Ingredient Readiness:
Measure flour, cocoa, and sugar, then sift together; bring butter, buttermilk, and eggs to room temperature.
-
Flavor Development:
Cream butter and sugar until light, then fold in cocoa and vinegar; the batter will take on a reddish sheen.
-
Texture Control:
Do not over‑mix after adding flour; gentle folding keeps the crumb tender.
-
Finishing Touches:
Spread a generous layer of cream cheese frosting while the cake is still warm, letting it melt slightly for extra gloss.
-
Serving Timing:
Let the cake cool completely before slicing; the flavors meld best after an hour at room temperature.
- Use gel food coloring for a richer hue without extra liquid.
- Separate eggs and beat whites to soft peaks for a lighter texture.
- Add a teaspoon of vanilla extract for an aromatic lift.
Pro Tips
When you bake, pause a moment to inhale the aroma; it reminds you why home baking feels like a quiet celebration. The frosting can be made a day ahead – it actually becomes smoother. I mean, the little details make the whole experience feel special, and that’s what I love about sharing recipes.
The essence of the dish:
A fun fact or historical angle:
Flavor or sensory focus:
You Must Know
- Do not over‑mix the batter
- Use room‑temperature dairy
- Allow the frosting to soften
Frequently Asked Questions
→ Can I make this cake gluten‑free?
Yes, substitute the all‑purpose flour with a 1‑to‑1 gluten‑free blend and check that the baking powder is also gluten‑free.
→ How do I store leftover cake?
Wrap slices tightly in plastic wrap and keep them in the refrigerator for up to three days; the frosting stays fresh and the crumb stays moist.
→ What if I don’t have buttermilk?
Combine 1 cup of milk with 1 tablespoon of lemon juice or vinegar and let sit 5 minutes; it will curdle and work the same.
→ Can I use buttercream instead of cream cheese frosting?
You can, but the classic tangy flavor of cream cheese is what gives red velvet its signature contrast.
→ How long does the cake stay fresh?
At room temperature, the cake is best within two days; refrigerated, it lasts up to a week.
→ Is the red color natural?
We use gel food coloring for the vibrant hue; natural beet juice can be used but gives a softer shade.
Chef's Tips
If you prefer a richer chocolate flavor, increase cocoa to 3 tbsp.,For a glossy finish, brush the top layer lightly with a simple syrup before frosting.,Make sure all dairy ingredients are at room temperature to avoid a curdled batter.
Nutrition Facts
per serving
420
Calories
5g
Protein
55g
Carbs
22g
Fat
Taste Profile
Richly sweet with a gentle cocoa undertone and tangy frosting
Ingredient Substitutions
Don't have an ingredient? Try these alternatives
Ensure the blend contains xanthan gum for structure.
May alter flavor slightly; choose a high‑quality brand.
Recipe Variations
Try these delicious twists on the original
Spicy Version
Add 1/2 tsp ground cinnamon and a pinch of cayenne for a subtle warmth.
Mediterranean Style
Fold in orange zest and garnish with toasted pistachios for a bright twist.
Common Mistakes to Avoid
Learn from others' mistakes for perfect results
- Over‑mixing the batter, which can make the cake dense.
- Using liquid food coloring that thins the batter.
- Not allowing the cake to cool completely before frosting.
Meal Prep & Storage
Make Ahead Tips
You can bake the layers up to 2 days ahead and store them wrapped in the fridge; frost just before serving for the freshest texture.
Leftover Ideas
Reheat a slice gently in the microwave for 10‑15 seconds, or enjoy at room temperature; the frosting stays creamy.
Perfect Pairings
Serve this with...
Cooking Timeline
Gather and measure all ingredients; preheat the oven.
Cream butter and sugar, then add eggs and flavorings.
Incorporate dry ingredients and buttermilk, divide batter into pans.
Bake cakes, then cool on racks.
Prepare frosting while cakes cool, then assemble and frost.

Red Velvet Cake
A classic red velvet cake with tender crumb, subtle cocoa flavor, and a silky cream cheese frosting that makes every celebration feel a little softer and sweeter.
Timing
Prep Time
20 Minutes
Cook Time
30 Minutes
Total Time
50 Minutes
Recipe Details
Ingredients
Cake
- 01 2 1/2 cups all‑purpose flour
- 02 1/4 cup unsweetened cocoa powder
- 03 1 1/2 tsp baking soda
- 04 1 tsp salt
- 05 1 cup unsalted butter, softened
- 06 1 1/2 cups granulated sugar
- 07 2 large eggs, room temperature
- 08 1 cup buttermilk, room temperature
- 09 2 tbsp red gel food coloring
- 10 1 tsp vanilla extract
- 11 1 tsp white vinegar
Cream Cheese Frosting
- 01 8 oz cream cheese, softened
- 02 1/2 cup unsalted butter, softened
- 03 3 cups powdered sugar
- 04 1 tsp vanilla extract
- 05 Pinch of salt
Instructions
Preheat the oven to 350°F (175°C). Grease two 9‑inch round cake pans and line the bottoms with parchment paper.
In a bowl, whisk together flour, cocoa powder, baking soda, and salt; set aside.
In a large mixer, cream butter and sugar until light and fluffy, about 3‑4 minutes.
Add eggs one at a time, beating well after each, then stir in vanilla, vinegar, and red food coloring until the batter is smooth.
Gradually add the dry ingredients, alternating with buttermilk, starting and ending with the flour mixture. Mix just until combined.
Divide batter evenly between the prepared pans and bake for 25‑30 minutes, or until a toothpick comes out clean. Let cakes cool in pans 10 minutes, then turn onto a wire rack to cool completely.
While the cakes cool, beat cream cheese and butter together until creamy. Add powdered sugar gradually, then vanilla and a pinch of salt; beat until smooth.
Place one cake layer on a serving plate, spread a generous layer of frosting, top with the second layer, and frost the top and sides. Finish with a swirl or simple piped borders.
Notes & Tips
- 1 If you prefer a richer chocolate flavor, increase cocoa to 3 tbsp.
- 2 For a glossy finish, brush the top layer lightly with a simple syrup before frosting.
- 3 Make sure all dairy ingredients are at room temperature to avoid a curdled batter.
Tools You'll Need
-
Two 9‑inch round cake pans
-
Electric mixer
-
Rubber spatula
-
Parchment paper
-
Cooling rack
Must-Know Tips
- Do not over‑mix after adding flour; the cake stays tender.
- Use gel food coloring for a vivid red without extra liquid.
- Allow the cake to cool completely before frosting to prevent melting.
Professional Secrets
- Room temperature butter and eggs create an emulsion for a uniform crumb.
- Baking at a consistent 350°F ensures even rise and moisture retention.
- Folding in flour gently keeps air pockets for a lighter texture.

Recipe by
AmeliaAmelia is a seasoned food blogger and recipe creator at CookDishWorld, where she blends culinary expertise with an unwavering love for sharing delicio ...
Get Delicious Recipes Weekly
Join 25,000+ home cooks getting our best recipes straight to their inbox.
Free forever • No spam • Unsubscribe anytime