Why You'll Love It
- - The strawberry swirl creates a stunning visual contrast.
- - A buttery crust adds a comforting, slightly crisp base.
- - Cream cheese provides a smooth, melt‑in‑the‑mouth texture.
- - Easy to make ahead, perfect for any celebration.
"The swirl is so beautiful, and the flavor is pure comfort – a true crowd‑pleaser!"
Essential Ingredient Guide
- Cream cheese: Choose full‑fat cream cheese for a richer mouthfeel; let it soften at room temperature.
- Fresh strawberries: Select ripe, fragrant berries; hull and slice them for the swirl.
- Graham crackers: The crumbs give the crust a subtle sweetness and buttery crunch.
- Sugar: Balances the tartness of the berries; adjust to taste.
- Lemon juice: Adds a bright note that lifts the overall flavor.
- Vanilla extract: A small dash adds depth without overpowering the fruit.
Complete Cooking Process
-
Ingredient Readiness:
Soak the crust crumbs in melted butter, soften the cream cheese, and puree half the strawberries.
-
Flavor Development:
Blend the cheese base, then fold in the strawberry puree to create ribbons.
-
Texture Control:
Press the crust evenly and chill it before adding the filling to set the base.
-
Finishing Touches:
Top with fresh strawberry slices and a light dusting of powdered sugar.
-
Serving Timing:
Allow the cheesecake to rest in the fridge for at least 4 hours, preferably overnight.
- Avoid over‑mixing the filling; it can become watery.
- Use a springform pan for easy removal.
- Chill the crust for 10 minutes before adding filling.
- Swirl gently with a knife for a marble effect.
Pro Tips
These little adjustments make a big difference. I’ve found that letting the crust set a bit before pouring the filling prevents sogginess. Also, a gentle swirl creates that classic look without breaking the smooth texture. It’s a quiet pleasure to watch the pink ribbons dance through the white canvas, and the result feels like a soft, sweet hug.
The essence of the dish:
A fun fact or historical angle:
Flavor or sensory focus:
You Must Know
- Keep the filling chilled before swirling.
- Use ripe strawberries for natural sweetness.
- Do not over‑beat the cream cheese.
- Allow the cheesecake to set fully before slicing.
Frequently Asked Questions
→ Can I use frozen strawberries?
Yes, thaw them completely and drain excess liquid before pureeing.
→ How long can the cheesecake be stored?
It stays fresh in the refrigerator for up to 4 days, tightly covered.
→ Can I make a gluten‑free crust?
Swap graham crackers for gluten‑free cookie crumbs and proceed as usual.
→ What if I don’t have a springform pan?
A regular 9‑inch round pan works; line the sides with parchment for easy removal.
→ How do I achieve a perfect swirl?
Drop dollops of strawberry puree onto the filling and use a skewer to create gentle ribbons.
→ Is the recipe suitable for a dairy‑free diet?
Use a dairy‑free cream cheese alternative and dairy‑free butter for the crust.
Chef's Tips
Avoid opening the oven door frequently; it can cause cracks.,Let the cheesecake chill overnight for the best sliceable texture.,Use a hot water bath to ensure even baking and prevent cracking.
Nutrition Facts
per serving
420
Calories
9g
Protein
35g
Carbs
28g
Fat
Taste Profile
Creamy with a bright strawberry tang
Ingredient Substitutions
Don't have an ingredient? Try these alternatives
Will be tangier; adjust sugar slightly.
Provides a similar buttery flavor.
Recipe Variations
Try these delicious twists on the original
Spicy Version
Add a pinch of cayenne and a few drops of hot chocolate sauce for a subtle kick.
Mediterranean Style
Incorporate crumbled feta, sliced olives, and sun‑dried tomato ribbons on top.
Common Mistakes to Avoid
Learn from others' mistakes for perfect results
- Over‑mixing the filling, resulting in a watery texture.
- Opening the oven door too often, causing cracks.
- Using cold butter for the crust, which leads to a dry base.
Meal Prep & Storage
Make Ahead Tips
Prepare the crust and filling up to the baking step; refrigerate the assembled, unbaked cheesecake for up to 24 hours. Bake when ready.
Leftover Ideas
Reheat gently in a skillet over low heat, or enjoy cold straight from the fridge.
Perfect Pairings
Serve this with...
Cooking Timeline
Preheat oven, prepare crust, and press into pan.
Bake crust and let it cool while mixing filling.
Blend cream cheese, sugar, eggs, and flavorings.
Create strawberry puree, fold into half the filling, swirl.
Bake cheesecake in water bath, then cool in oven.
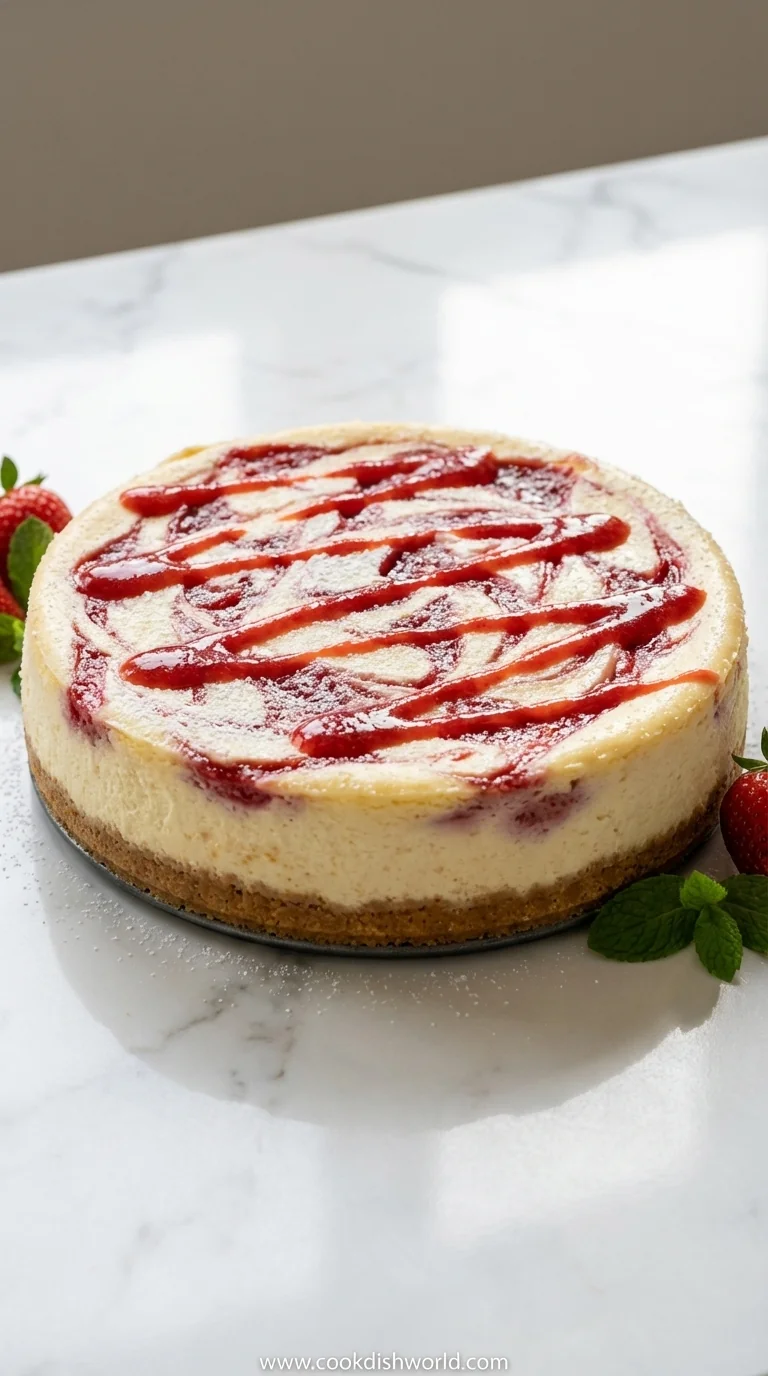
Strawberry Swirl Cheesecake
A velvety strawberry swirl cheesecake with a buttery crust that feels like a gentle celebration of summer berries, perfect for any gathering.
Timing
Prep Time
20 Minutes
Cook Time
0 Minutes
Total Time
4 Hours 20 Minutes
Recipe Details
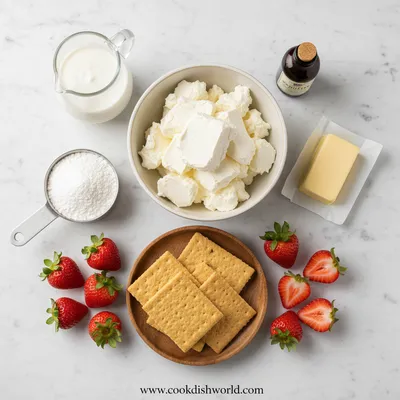
Ingredients
Crust
- 01 1 ½ cups graham cracker crumbs
- 02 ¼ cup melted butter
- 03 2 tbsp sugar
Filling
- 01 24 oz (3 cups) full‑fat cream cheese, softened
- 02 ¾ cup granulated sugar
- 03 2 large eggs
- 04 ½ cup sour cream
- 05 1 tsp vanilla extract
- 06 2 tbsp lemon juice
- 07 ½ cup fresh strawberries, pureed
- 08 ½ cup fresh strawberries, sliced
Instructions
Preheat the oven to 325°F (160°C). Combine graham crumbs, sugar, and melted butter; press evenly into the bottom of a 9‑inch springform pan.
Bake the crust for 8‑10 minutes until lightly golden; let cool while you prepare the filling.
In a large bowl, beat the cream cheese until smooth, then add sugar and beat until creamy.
Add eggs one at a time, mixing gently; stir in sour cream, vanilla, and lemon juice.
Divide the filling in half. To one half, stir in the strawberry puree, creating a pink‑tinted mixture.
Pour the plain cheese layer over the crust, then dollop the pink mixture on top. Use a knife or skewer to gently swirl the two colors.
Bake the cheesecake on a water bath for 45‑50 minutes, until the edges are set but the center still jiggles slightly.
Turn off the oven, crack the door, and let the cheesecake cool for 1 hour before refrigerating.
Notes & Tips
- 1 Avoid opening the oven door frequently; it can cause cracks.
- 2 Let the cheesecake chill overnight for the best sliceable texture.
- 3 Use a hot water bath to ensure even baking and prevent cracking.
Tools You'll Need
-
9‑inch springform pan
-
Food processor
-
Mixing bowls
-
Hand mixer
-
Spatula
-
Measuring cups and spoons
Must-Know Tips
- Don’t over‑beat the filling, it can become watery.
- Let the crust set a few minutes before adding filling.
- Use room‑temperature ingredients for smooth blending.
Professional Secrets
- Room temperature cream cheese ensures an even batter.
- Baking in a water bath creates gentle, uniform heat.
- Let the cheesecake rest in the oven after baking to avoid cracks.

Recipe by
AmeliaAmelia is a seasoned food blogger and recipe creator at CookDishWorld, where she blends culinary expertise with an unwavering love for sharing delicio ...
Get Delicious Recipes Weekly
Join 25,000+ home cooks getting our best recipes straight to their inbox.
Free forever • No spam • Unsubscribe anytime